A nice package can be both beautiful and functional. The image is CC by MIAD Communication Design.
Inspired by this post by Szilard Pafka I decided to do a similar adventure in a Windows environment and see what problems I run into.
Start by installing Eclipse & StatET, the installation can sometimes cause some annoyances. I’ve covered a lot of them in my previous post.
Documentation is everything
After years of programming I can tell you that having a simple way to document your code is vital. Your code should always try to be self-explanatory, but adding good documentation is vital. The R-group has recognized this, and you’re forced to produce examples and full documentation before you can publish anything on their CRAN-server. A simple and great tool for this is the Roxygen2 package.
Start by installing the Roxygen2 package:
install.packages("roxygen2")
Unfortunately it seems Roxygen dropped its support for the convenient “R CMD Roxygen“. Fortunately I’ve found a handy work-around this problem:
- Go into the menu Run > Run Configurations….
- Here you choose the R Console and press the New launch button
- Name the console to something nice that you’ll remember, for instance “Roxygenise package”
- Set the Working directory to ${project_loc} (you can also find it in the [+] button’s insert variable list)
- Add as Options/Arguments:
–no-save
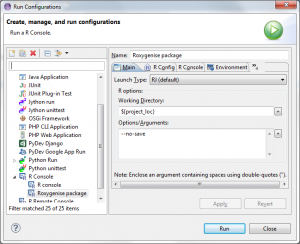
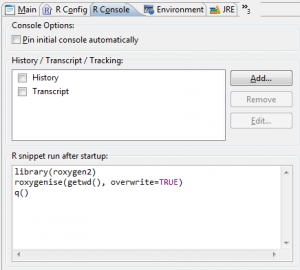
- Now choose the R Console tab and add following to the R snippet run after startup:
library(roxygen2)
roxygenise(getwd(), overwrite=TRUE)
q()
- That’s it – now click on your project and choose the Roxygenise package configuration.
Creating the package
Choose create new project, File > New > Project… and select the StatET > R Package Project and click your way through the popups.
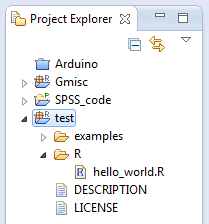
I use the following directory/file structure in my package:
\examples
\man
\R
DESCRIPTION
LICENSE
The bold are the directories while the DESCRIPTION and LICENSE files are required files. The DESCRIPTION file looks like this:
Package: test
Version: 0.1.0
Date: 2012-11-20
Title: A test
Authors: c(person("Max Gordon",
    "Developer",
    email = "...."))
Author: Max Gordon
Maintainer: Max Gordon <max@gforge.se>
Description: bla, blah..
License: GPL (>= 2)
Depends:
    stringr
Suggests:
    testthat
I’ve added the Depends and Suggests just to give an idea of how you enter these. If you have more Depends then just add them by separating with a comma (,). The LICENSE file is just a basic GPL-copy:
Copyright (C) 2012 Max Gordon,
orthopaedic surgeon and PhD-student at the Karolinska Institute

This program is free software; you can redistribute it and/or modify it
under the terms of the GNU General Public License as published by the
Free Software Foundation; either version 2, or (at your option) any
later version.

These functions are distributed in the hope that they will be useful,
but WITHOUT ANY WARRANTY; without even the implied warranty of
MERCHANTABILITY or FITNESS FOR A PARTICULAR PURPOSE.  See the
GNU General Public License for more details.

The text of the GNU General Public License, version 2, is available
as http://www.gnu.org/copyleft or by writing to the Free Software
Foundation, 59 Temple Place - Suite 330, Boston, MA 02111-1307, USA.
Now create a file called hello_world.R under the \R directory. The file can contain one or more functions. It’s important that you have the proper Roxygen documentation:
#' My awesome function
#'
#' @param name The name that is to be printed
#' @return void
#'
#' @examples
#' hello_world("Max")
#'
#' @author max
#' @export
hello_world <- function(name){
  print(sprintf("Hello %s!", name))
}

#' My awesome function number 2
#'
#' @param name The name that is to be printed
#' @return void
#'
#' @example examples/hello_world_alt_example.R
#'
#' @author max
#' @export
hello_world_alternative <- function(name){
  print(sprintf("Cool to meet you, %s!", name))
}
As you can see the second function has an external example file. I find this very convenient when I have more associated code, in this case it might be a little over-doing. Anyway, in the \examples directory create a file hello_world_alt_example.R that contains the following code (add an empty line at the end to avoid a warning message by Roxygen):
# An example file
#
# Nice to have if you have
# longer examples that you
# want to put outside your main code

name <- "Max"
hello_world_alternative(name)
All you need to do now is just run the Roxygenise package! Do this by clicking on the project name:
and choosing the Roxygenise package:
 This creates additional directories, click on the project and refresh by pressing F5. The new directory structure contains the additional directories \inst and \man, it has also created the NAMESPACE file.
Checking and building the package
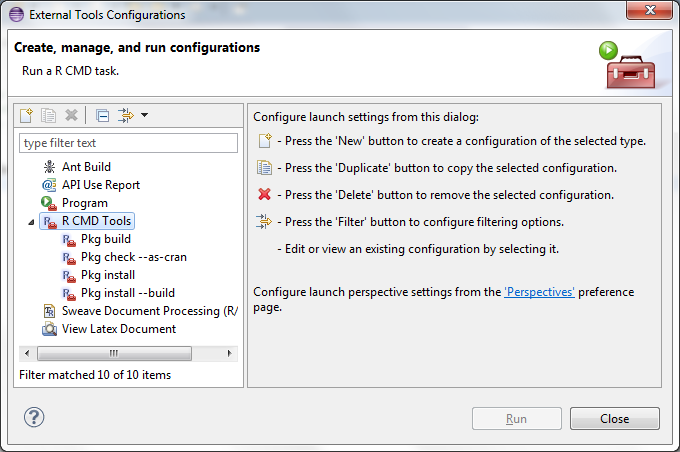
Now you need to create a few R CMD commands. Make sure you've downloaded the Rtools package. First, open Run >External tools > External tools configurations ... and create the following four R CMD commands:
Just keep adding by clicking the new icon until you have four. You can skip the Pkg install if you want but it's convenient to have if you're not interested in exporting your package. In the Options/Arguments text area you add options --build for the Pkg install build R CMD while you add --as-cran in the Pkg check to get the stricter check for the CRAN repository in case you want to upload you package there in the future.
Start by checking your package with the Pkg check --as-cran external tool. It checks all including the examples. Writing good, complete examples is an excellent way of checking that nothing in the packages suddenly breaks expected behavior - this is awesome when you have a multitude of functions, our hello_world project is probably less dependent on a thorough check.
Now run the Pkg install and viola, the package is available on your computer next time you restart R. To get versions that you need for exporting onto a CRAN server you run the Pkg build and the Pkg install --build. The zip file is the windows binary and the tar.gz file is the source file. These archives are created in the eclipse directory.
Note, if you get an error: "Variable references empty selection: ${resource_loc}" you need to refocus on the project.
Phew... it was a long post but hopefully it was somewhat helpful. I've also have a small post on creating your own CRAN repository.

